150Mbps 4G LTE USB Modem Setup
What You'll Achieve
By the end of this guide, your Raspberry Pi will have a reliable 4G LTE internet connection through a USB network adapter, perfect for drone streaming in areas without WiFi.
💡 Why USB Network Mode?
- Lower latency - Direct connection without WiFi overhead
- More reliable - No wireless interference issues
- Power efficient - USB provides both data and power
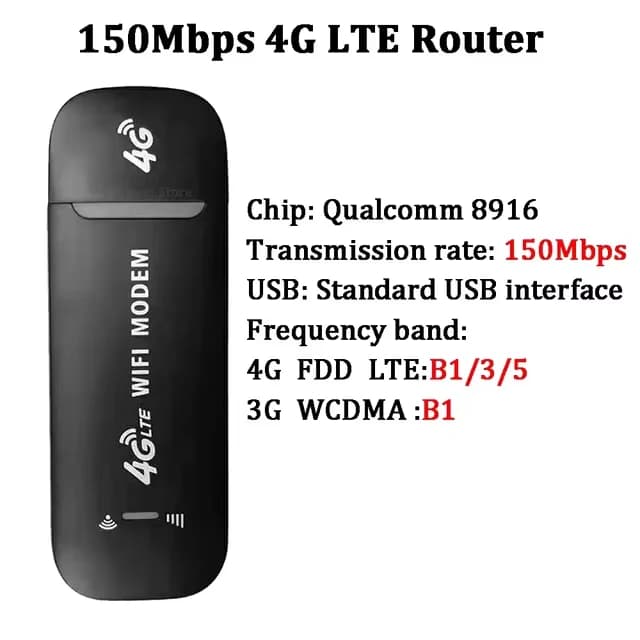
- Cost effective - Only $8 on AliExpress
📋 Before You Start
Make sure you have everything ready:
- USB modem - The 150Mbps 4G LTE modem from the link above
- SIM card - With active data plan (no PIN lock)
- Raspberry Pi - With SSH access enabled
- Internet connection - For initial package installation
🗺️ Setup Overview
Step 1-2
Prepare Hardware
5 minutes
Step 3-5
Configure Modem
10 minutes
Step 6-7
Connect & Test
5 minutes
🔌 Step-by-Step Setup
💡 What we're doing: We'll convert the modem from its default WiFi hotspot mode to a USB network adapter mode. This gives your Raspberry Pi direct internet access with better performance.
Insert SIM Card & Connect
🕒 Time: 2 minutes
Why: The modem needs a SIM card with data to provide internet.
- Slide the back cover downward to open
- Insert SIM card (gold contacts facing down)
- Replace cover and plug modem into Raspberry Pi USB port
- Wait 30 seconds for the LED to turn on
✓ Success: LED is on (solid or blinking)
⚠️ Note about APN
Most carriers use "internet" as the default APN, which this modem usually auto-configures. If you have connection issues later, you may need to set it manually via the web interface at 192.168.1.1
Install Required Software
🕒 Time: 3 minutes
Why: These tools let us switch the modem from WiFi to USB network mode.
SSH into your Raspberry Pi and run:
sudo apt-get update && sudo apt-get install -y usb-modeswitch usb-modeswitch-data✓ Success: Installation completes without errors
Create Mode Switch Configuration
🕒 Time: 1 minute
Why: This configuration file tells the modem to switch from WiFi hotspot to USB network mode.
sudo tee /etc/usb_modeswitch.d/12d1:14db << 'EOF'
# Qualcomm 8916 - Switch to RNDIS mode
DefaultVendor=0x12d1
DefaultProduct=0x14db
MessageContent="55534243123456702000000080000c85010101180101010101000000000000"
NoDriverLoading=1
EOF
✓ Success: File created at /etc/usb_modeswitch.d/12d1:14db
Create Auto-Switch Rule
🕒 Time: 1 minute
Why: This makes the mode switch happen automatically whenever you plug in the modem.
sudo tee /etc/udev/rules.d/70-qmi-to-rndis.rules << 'EOF'
SUBSYSTEM=="usb", ATTRS{idVendor}=="12d1", ATTRS{idProduct}=="14db", RUN+="/usr/sbin/usb_modeswitch -v 12d1 -p 14db -c /etc/usb_modeswitch.d/12d1:14db"
EOF
✓ Success: Rule file created successfully
Apply Changes & Reconnect
🕒 Time: 2 minutes
Why: We need to reload the system rules and physically reconnect the modem to trigger the mode switch.
First, reload the rules:
sudo udevadm control --reload-rules
sudo systemctl restart ModemManager
Then reconnect the modem:
- Unplug the USB modem
- Wait 5 seconds
- Plug it back in
- Wait 30 seconds for mode switch
✓ Success: Modem reconnected and mode switched
Configure Network
🕒 Time: 1 minute
Why: The modem is now in USB network mode, but we need to request an IP address to connect to the internet.
sudo dhclient usb0This command may take 10-20 seconds to complete.
✓ Success: Command completes without errors
Verify Connection
🕒 Time: 1 minute
Why: Let's make sure everything is working correctly before moving on.
# Check interface exists
ip addr show usb0

# Test internet connection
ping -c 4 google.com
✓ Success: You see an IP address on usb0 and ping responds successfully
🎉 Setup Complete!
Your modem is now providing internet directly via USB connection.
🔧 Troubleshooting
Common Issues
❌ Modem not detected
- Check LED is on (if off, try different USB port)
- Wait full 60 seconds after plugging in
- Try USB 2.0 port instead of 3.0
- Check SIM card is inserted correctly
- Verify with:
lsusb | grep 12d1
❌ No internet after setup
- Verify SIM has active data plan
- Check if APN configuration is needed for your carrier
- Try accessing modem web interface:
192.168.1.1 - Check signal strength (should have at least 2 bars)
USB Mode Issues
❌ No usb0 interface after mode switch
- Check modem vendor/product ID:
lsusb | grep 12d1 - Try manual switch:
sudo usb_modeswitch -v 12d1 -p 14db -c /etc/usb_modeswitch.d/12d1:14db - Check kernel messages:
dmesg | tail -50 - Ensure ModemManager is not interfering:
sudo systemctl stop ModemManager
❌ Interface exists but no internet
- Run dhclient again:
sudo dhclient -v usb0 - Check routing:
ip route - Restart networking:
sudo systemctl restart networking
📋 Additional Information
Supported Networks:
4G LTE, 3G WCDMA, 2G GSM (auto-switching)
Default Credentials:
Web interface: admin/admin (check device label)
Power Consumption:
~2W average (500mA @ 5V)
LED Indicators:
- Solid: Connected to network
- Blinking: Searching for network
- Off: No power or SIM issue
🚀 Next Steps
Now that your internet connection is set up, you can:
On This Page